
FNIRSI-2031H цифровой осциллограф 2 4-дюймовый Экран 200 мс/с частота дискретизации 30 МГц
7 734,83 руб.


Новое поступление
Характеристики
*Текущая стоимость уже могла изменится. Что бы узнать актуальную цену и проверить наличие товара, нажмите "Добавить в корзину"
| Месяц | Минимальная цена | Макс. стоимость | Цена |
|---|---|---|---|
| Mar-29-2026 | 0.23 руб. | 0.33 руб. | 0 руб. |
| Mar-01-2026 | 0.19 руб. | 0.55 руб. | 0 руб. |
| Jan-29-2026 | 0.32 руб. | 0.82 руб. | 0 руб. |
| Dec-29-2025 | 0.7 руб. | 0.65 руб. | 0 руб. |
| Nov-29-2025 | 0.66 руб. | 0.36 руб. | 0 руб. |
| Oct-29-2025 | 0.44 руб. | 0.0 руб. | 0 руб. |
| Sep-29-2025 | 0.90 руб. | 0.16 руб. | 0 руб. |
| Aug-29-2025 | 0.43 руб. | 0.64 руб. | 0 руб. |
| Jul-29-2025 | 0.95 руб. | 0.4 руб. | 0 руб. |
Описание товара


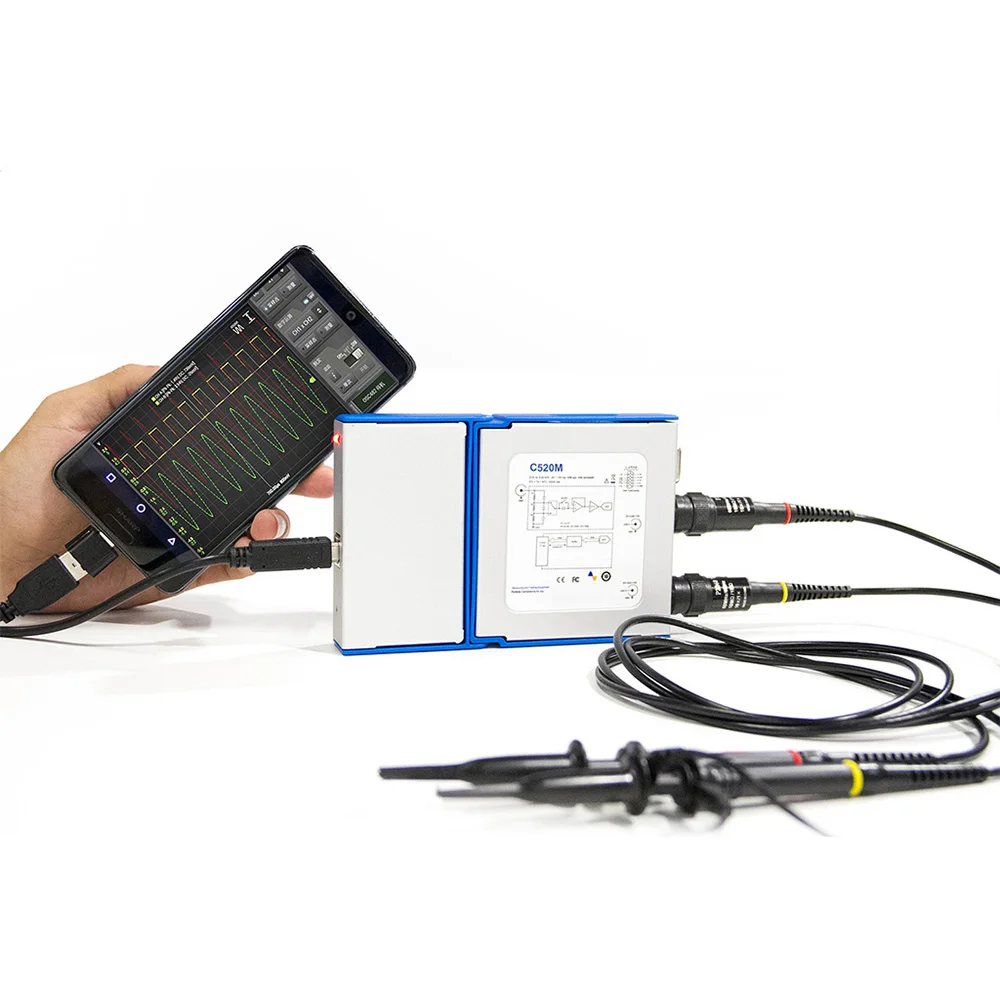
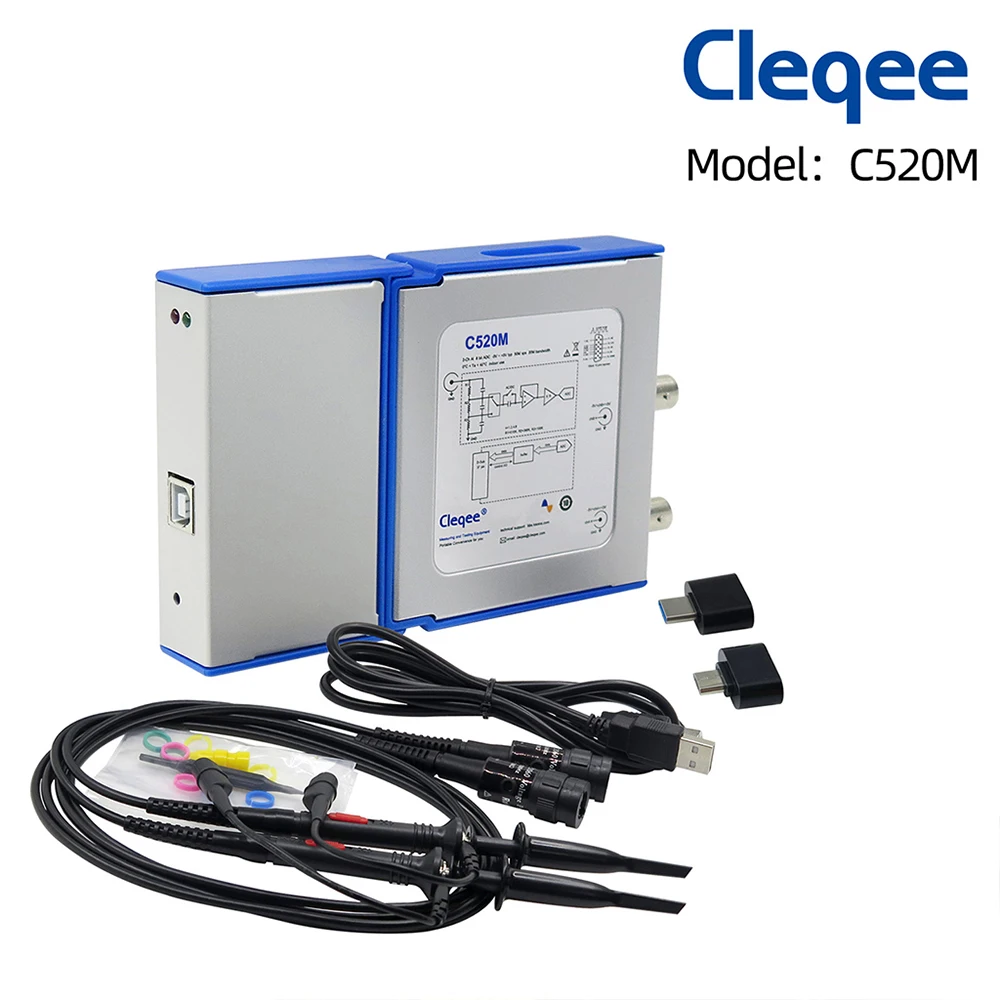
Note: Only C520M can connect to Android Phone .Other models can not !!
//www.dropbox.com/sh/z2u1oqicff5e2zs/AACc2mQuteRbmqH8QyuPMyRBa?dl=0
//www.dropbox.com/sh/z2u1oqicff5e2zs/AACc2mQuteRbmqH8QyuPMyRBa?dl=0
2.C520X:
//www.dropbox.com/sh/z2u1oqicff5e2zs/AACc2mQuteRbmqH8QyuPMyRBa?dl=0
3.C550:
//www.dropbox.com/sh/o7cxk3b4vqxsc27/AAAgitHSnzYO_0biKk8q88T7a?dl=0

AT A GLANCE
|
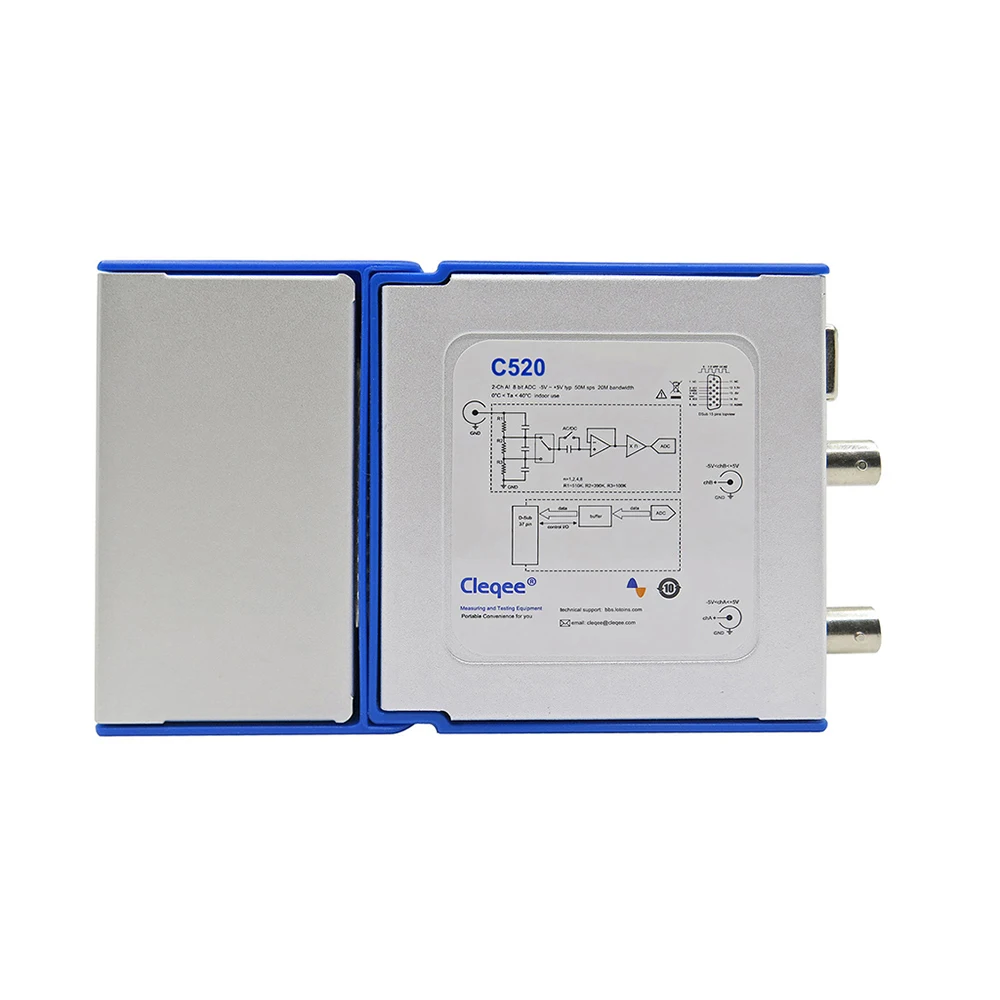
Model: |
C520 |
C520M |
C520X |
C550 |
|
Input channels: |
2 |
2 |
||
|
Maximum sampling rate (S/s): |
50M |
1G |
||
|
Bandwidth (−3 dB): |
20M |
50M Hz |
||
|
FFT: |
YES |
YES |
YES |
YES |
|
Data logger: |
YES |
YES |
YES |
YES |
|
I/O extension: |
YES |
YES |
YES |
NO |
|
Serial bus decoding: |
NO |
NO |
NO |
YES |
|
Hardware trigger: |
NO |
NO |
NO |
YES |
|
Ext trigger module support: |
NO |
NO |
NO |
YES |
|
Signal generator module support: |
NO |
NO |
YES |
NO |
|
Logic analyzer module support: |
NO |
NO |
YES |
YES |
AT A GLANCE
Requirements
C520M can’t support all kinds of Android devices. Customers may need to check their Android phone/Tablet with these requirements, or check the support list.
|
Device Operative System |
Android API 16+ (Android 4.1) |
|
Device Kind |
Phone, Tablet, TV Box |
|
Device Specifications |
USB OTG Support, 2GB RAM or more |
|
USB OTG Cable |
B type male to micro c , type c or others(depend on your Android device) |
|
USB Oscilloscope |
LOTO OSC482M |
App Specifications
|
High Frame Rate |
Real-time oscilloscope, up to 500 scans per second and 25 FPS. |
|
Input Range |
±250mV to ±5V (for X1 probe). |
|
±2.5V to ±50V (for X10 probe). |
|
|
±25V to ±500V (for X100 probe). |
|
|
Sampling Rate |
500Sa/s to 48MSa/s. |
|
Memory Length |
1024 Samples. |
|
Software trigger and AC/DC |
Improved software trigger with stabilizer. Auto, Normal and Single Trigger modes.AC/DC control. |
|
Full statistics |
Peak-Peak, Max, Min, RMS and DC value. Frequency and duty cycle. Cursors for manual calculations. |
|
FFT |
Real-time processing with the possibility to select among several windows. Peak detects and Peak-hold functions. Available only for Channel A. |
|
Sinc Interpolator |
Sinc interpolator with infinite sampling rate for the best signal view. Maximum visible frequency = Sampling rate / 4. |
|
Phosphor decay effect |
Plot multiple signal traces on the screen. |
|
XY Plot |
Calculate and visualize difference among 2 signals, amplitude, frequency, phase and delay. |
|
Math functions |
Apply operations on single or both channels: invert, +, -, x, : |
|
Probe setting |
Direct calculation of current value according the probe setting used (x1, x10). |
|
Data export |
data available in .csv and Matlab format. |
|
Calibration |
Calibration function available. |
|
Other |
Screenshot function. |
This is a device list of updates we currently maintain. If you have new device information, please contact us to update.
|
Support |
Not support
|
|||||
|
Pixel 2 XL |
Aquaris E5 FHD |
OPPO
|
A59S
|
|||
R9S
|
||||||
|
HM Note 2 |
LGE V20 (elsa) |
VIVO
|
X9
|
|||
X20PLUS
|
||||||
|
Leagoo KIICAA MIX |
ZenFone 3 Max |
X21
|
||||
|
HTC M8 |
X10 |
HUAWEI P20
|
||||
|
Samsung S3 |
ZenFone 3 Zoom |
|
||||
|
Samsung GT-N5110 |
M3s |
|
||||
|
Cat S60 |
LG G3 |
|
||||
|
Iconia One 8 |
HP 7.1 |
|
||||
|
Oppo A1601 |
Fonepad 7 |
|
||||
|
Prestigio PMT3101 |
GT-810 |
|
||||
|
Transformer Pad (TF103C) |
One |
|
||||
|
Blackview BV8000 Pro |
DROID Turbo 2 |
|
||||
|
Asus ZenFone 2 |
Xperia X |
|
||||
|
Sony Xperia XZ Premium |
Dell Venue 8 |
|
||||
|
Iconia One 8 |
HTC One |
|
||||
|
ZenFone 4 Selfie |
Aquaris E5 FHD |
|
||||
|
HM Note 2 |
Nexus 7 |
|
||||
|
Galaxy |
S Duos2 |
Lenovo |
TAB 10 |
|
||
|
S4 |
TAB 2 A10-30 |
|||||
|
S6 edge+ |
Tap |
|||||
|
Tab S3 |
TAB3 7 Essential |
|||||
|
Tab E 9.6 |
K5 Note |
|||||
|
Tab S2 8.0 |
HUAWEI |
X7 |
||||
|
Tab A (2016) |
BLN-AL40 |
|||||
|
S7 |
NOVA 3I |
|||||
|
S7 edge |
P8 |
|||||
|
Note2 |
P9 |
|||||
|
Note4 |
MATE 9 |
|||||
|
Note8 |
NOVA 2PLUS |
|||||
|
Note9 |
MATE 10 PRO |
|||||
|
Grand Prime |
Honor 9 |
|||||
|
J1 (2016) |
Honor 7X |
|||||
|
J7 |
X7 |
|||||
|
J7 Pro |
BLN-AL40 |
|||||
|
Xcover2 |
Moto |
X (2nd Gen) |
||||
|
A3 |
||||||
|
Premier |
|
|||||
|
S9 |
G (5th Gen) |
|
||||
|
A8 Star |
DROID Turbo 2 |
|
||||
|
A9 Pro |
Z Play |
|
||||
|
LG K8 |
ZenFone 3 Max |
|
||||
|
LG G4 |
X10 |
|
||||
|
Nexus 6 |
Samsung GT-N5110 |
|
||||
|
Acer B1-820 |
Xperia Z3 |
|
||||
|
Xperia X Compact |
ZenFone 3 Zoom |
|
||||
|
Fonepad 7 |
M3s |
|
||||
|
OnePlus5T |
LG G3 |
|
||||
|
Le Max2 |
HP 7.1 |
|
||||
|
GT-810 |
K5 Plus |
|
||||
|
One |
HTC One |
|
||||
|
ZenFone 2 |
DROID Turbo 2 |
|
||||
|
VIBE K6 Note |
Nexus 7 |
|
||||
|
KEYone |
Xperia X |
|
||||
|
7 Voyager |
Dell Venue 8 |
|
||||
|
xiaomi |
mix |
|
|
|||
|
A2 Lite |
||||||
|
Redmi
|
Note 4 |
|||||
|
4X |
||||||
|
5 Plus |
||||||
|
Note 5 Pro |
||||||
|
4 Pro |
||||||
|
4X |
||||||
|
Note 2 |
||||||
|
S2 |
||||||
|
3S |
||||||
|
SHARP |
AQUOS S2 |
|||||


Configuring Outputs
Select the IO pin that needs to be used as output and select the corresponding check box OUTPUT, select the output level HIGH or LOW for changing the pin state.

Configuring Inputs
IO pins can be set to to receive TTL levels, by selecting the check box INPUT. By clicking on the refresh button you can get the input level. High level is displayed as a green icon with ‘H’ in the middle, low level is displayed as a gray small icon with ‘L’.

Paperless recorder
This chapter introduces the basic concepts and usage of the paperless recorder, a software functional extension of the virtual oscilloscope hardware. 11.1 Basic Concepts of Paperless RecordersA paperless recorder is a data logger or data acquisition device used to record measurement data over time. A paperless recorder based on virtual oscilloscope hardware has the ability to record the collected or computed data in a storage system inside the software on a time basis, without consuming any paper, pen or ink. Common collected data are voltage, current, etc.
Introduction to Paperless Recorder Software

Common software interface
The Recorder software has an interface consistent with the oscilloscope software, so to be familiar to the user. Equipment monitoring After the software interface is opened, the OSC2002 device status will be monitored in real time. When the hardware device is connected to the USB port of the PC, the software interface will display a blue background and a message.If the hardware get disconnected or the software have no access to the device, then the display background will become yellow, showing a text alert.
Note
The paperless recorder software has exclusive access to the OSC2002 device. Therefore, the device can be used just with one software at a time.
Set the Total Record Duration
This panel allow to set the recording duration; it can be set in the range 1 minute ~ 3 days.

Set the Sampling Interval
This panel allow to set the sampling interval from 1 second to 1 hour.
When the device is not used it is recommended to close the software and then
Смотрите так же другие товары:


